Installing a 3-way switch with 3 lights allows you to control multiple lights from two different locations—perfect for hallways, staircases, or large rooms. This guide provides a detailed, step-by-step process to ensure a safe and efficient installation.
Whether you’re a DIY enthusiast or an electrician, mastering wiring a 3-way switch with 3 lights ensures seamless lighting control. Below, we cover tools, wiring diagrams, safety precautions, and troubleshooting tips for a flawless setup.
Tools & Materials Needed for Wiring a 3-Way Switch with 3 Lights
Before starting, gather these essentials:
| Item | Purpose |
|---|---|
| 3-way switches (2) | Control lights from two locations |
| 14/2 or 12/2 NM cable | Power supply and light connections |
| 14/3 or 12/3 NM cable | Traveler wires between switches |
| Light fixtures (3) | Lighting setup |
| Wire strippers | Strip insulation from wires |
| Voltage tester | Check for live circuits |
| Screwdrivers | Secure connections |
| Wire nuts | Secure wire connections |
| Electrical tape | Insulate connections |
⚡ Wiring Diagram for a 3-Way Switch with 3 Lights
A clear wiring diagram ensures correct connections. Below is a standard setup:
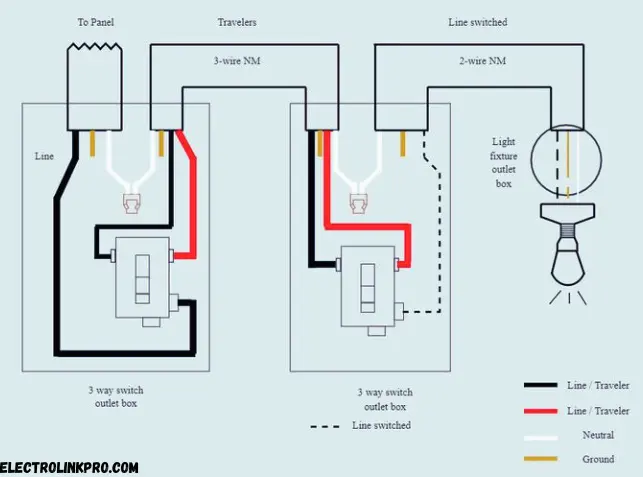
Key Connections:
- Hot wire (black): From the breaker to the first switch.
- Traveler wires (red & black): Between switches.
- Neutral wire (white): Direct to lights (bypasses switches).
- Ground wire (green/bare): Connects all devices for safety.
Step-by-Step Wiring:
- First 3-Way Switch:
- Black (hot) → Common terminal (usually darker screw).
- Red & black (travelers) → Brass screws.
- Ground → Green screw.
- Second 3-Way Switch:
- Black (hot to lights) → Common terminal.
- Red & black (travelers) → Brass screws.
- Ground → Green screw.
- Lights Connection:
- Connect all white (neutral) wires together.
- Black (hot from switch) → Light fixture hot.
- Ground wires → Fixture ground.
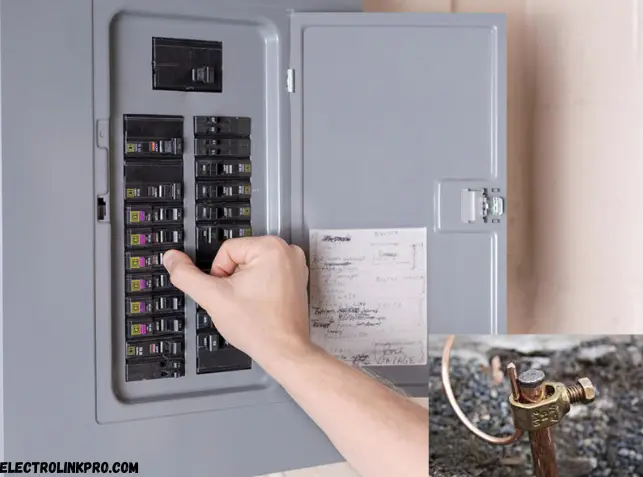
Step 1: Turn Off Power
- Locate the circuit breaker and shut off power to the switch box.
- Use a voltage tester to confirm no live current.
Step 2: Run Cables Between Switches & Lights
- 14/2 cable: Connects power source to the first switch.
- 14/3 cable: Runs between the two 3-way switches (carries traveler wires).
- 14/2 cables: Link lights in parallel or series (depending on setup).
🔧 Installing & Testing the 3-Way Switch with 3 Lights
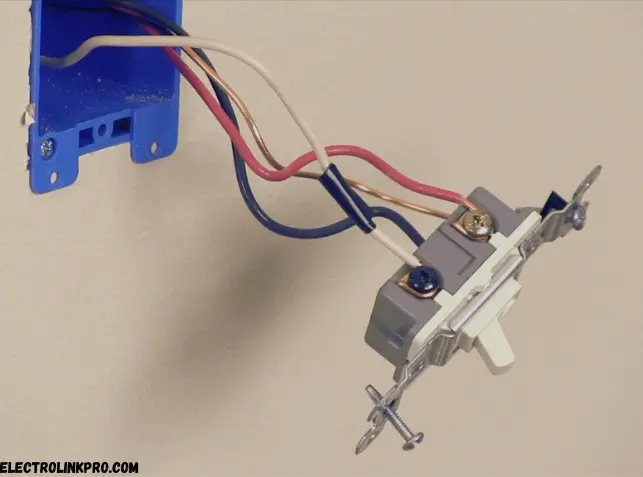
Step 1: Secure All Connections
- Use wire nuts for tight splices.
- Wrap connections with electrical tape for extra safety.
Step 2: Mount Switches & Fixtures
- Attach switches to electrical boxes.
- Install light fixtures securely.
Step 3: Restore Power & Test
- Turn the breaker back on.
- Test both switches—lights should turn on/off from either location.
🚨 Common Mistakes & Troubleshooting
❌ Frequent Errors:
- Incorrect traveler wire connections → Switches won’t work properly.
- Loose wire nuts → Causes flickering or failure.
- Skipping ground connections → Safety hazard.
✅ Fixes:
- Double-check traveler wire connections.
- Ensure all wire nuts are tight.
- Verify grounding on all devices.
Conclusion:
Successfully wiring a 3-way switch with 3 lights is a valuable skill that enhances convenience, safety, and functionality in your home. This setup allows you to control multiple lights from two different locations—ideal for large rooms, staircases, or hallways. By following the detailed steps, safety precautions, and troubleshooting tips outlined in this guide, you can confidently complete this electrical project with professional-level precision.
🔹 Key Takeaways for a Flawless Installation
- Safety First – Always turn off the power at the breaker and verify with a voltage tester before handling any wires.
- Correct Wiring Setup – Use 14/3 or 12/3 NM cable for traveler wires between switches and 14/2 or 12/2 NM cable for power and light connections.
- Proper Switch Connections –
- The common terminal (usually black screw) must connect to the hot wire (power source) on the first switch and the load wire (to lights) on the second switch.
- The traveler wires (red & black) must be securely connected to the brass screws on both switches.
- Secure and Insulate All Connections – Tighten wire nuts, wrap with electrical tape, and ensure grounding for safety.
- Testing & Troubleshooting – After installation, test both switches to confirm proper operation. If issues arise, recheck traveler wire connections and grounding.
🔹 Why This Setup Works Best
- Flexibility – Control lights from multiple entry points.
- Energy Efficiency – Avoid leaving lights on unnecessarily.
- Enhanced Home Value – Professional wiring improves functionality and safety.
🔹 When to Call an Electrician
While this guide simplifies wiring a 3-way switch with 3 lights, some scenarios require professional help:
- If the circuit keeps tripping after installation.
- If you encounter aluminum wiring (requires special connectors).
- If lights flicker or switches feel warm (indicating overload or faulty wiring).
🔹 Final Thoughts
By mastering this project, you not only improve your home’s lighting efficiency but also gain confidence in handling more advanced electrical work. Whether you’re a DIYer or an aspiring electrician, this guide ensures a safe, code-compliant installation.
🚀 Ready to upgrade your lighting control? Follow this guide, take your time, and enjoy the convenience of a professionally wired 3-way switch with 3 lights!
For more advanced electrical projects, check out our guides on 4-way switches, smart lighting setups, and dimmer switch installations. Happy wiring!
❓ FAQs: Wiring a 3-Way Switch with 3 Lights
1. Can I use a 3-way switch with LED lights?
Yes, but ensure compatibility—some LEDs may flicker if switches lack a neutral.
2. Why are my 3-way switches not working?
Check traveler wire connections—miswiring is the most common issue.
3. How many lights can a 3-way switch control?
Technically unlimited, but total load must not exceed the circuit’s amp rating.
4. Can I install a dimmer on a 3-way switch?
Yes, but use a 3-way compatible dimmer (one switch must be standard).
5. Do I need a special cable for 3-way switches?
Yes, 14/3 or 12/3 NM cable is required for traveler wires.
By following this guide, wiring a 3-way switch with 3 lights becomes an easy, rewarding project! 🎉
Official Electrical Wiring Resources:
- NEC Code – nfpa.org/nec
- OSHA Electrical Safety – osha.gov/electrical
- ESFI Wiring Guides – esfi.org
- UL Certified Products – ul.com
- CPSC Safety Tips – cpsc.gov/electrical
Always check local codes before wiring. ⚡