If you’re looking for a comprehensive Ibanez wiring diagram 3 way switch guide, you’re in the right place! Whether you’re upgrading, troubleshooting, or customizing your guitar’s electronics, understanding the Ibanez 3 way switch wiring is crucial. This guide covers everything from basic wiring setups to advanced modifications, ensuring your guitar delivers the best tone possible.
🔧 Ibanez 3 Way Switch Wiring Diagram Basics
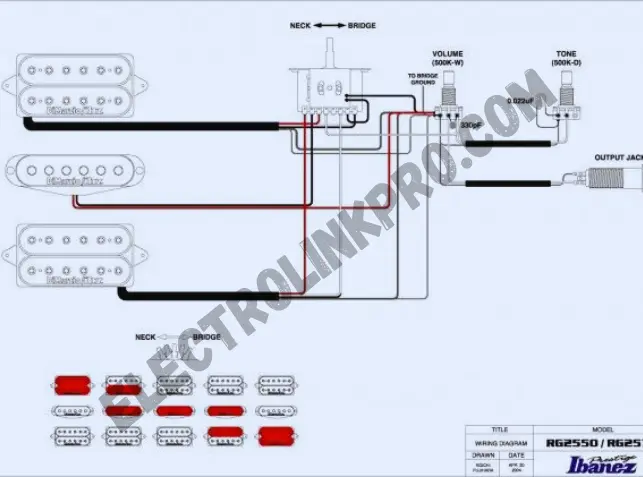
The Ibanez 3 way switch wiring diagram is essential for guitarists who want to modify or repair their instrument’s electronics. The 3 way switch allows you to toggle between different pickup configurations—typically neck, bridge, or both pickups combined.
📌 Standard Ibanez 3 Way Switch Wiring Configuration
| Terminal | Function | Connection |
|---|---|---|
| Common | Output to volume pot | Center lug of the switch |
| Neck | Connects to neck pickup | Left terminal (position 1) |
| Bridge | Connects to bridge pickup | Right terminal (position 3) |
| Middle | Both pickups active | Middle terminal (position 2) |
This setup is common in Ibanez RG, S, and SA series guitars. The Ibanez wiring diagram 3 way switch ensures smooth pickup switching and optimal signal flow.
omplete Step-by-Step Wiring Procedure for Ibanez 3 Way Switch
If you’re ready to wire or rewire your Ibanez 3 way switch, follow this detailed, step-by-step procedure to ensure perfect functionality. Whether you’re installing new pickups, fixing a faulty switch, or customizing your guitar’s electronics, this guide covers everything you need.
🔧 Tools & Materials Needed
Before starting, gather these essentials:
✅ Soldering iron (25-40W recommended)
✅ Rosin-core solder (60/40 lead-free)
✅ Wire cutters/strippers
✅ Multimeter (for continuity testing)
✅ Ibanez wiring diagram 3 way switch (specific to your model)
✅ Shielded guitar wire (for clean signal transfer)
✅ Heat shrink tubing (optional, for insulation)
⚡ Step-by-Step Wiring Procedure
1️⃣ Remove Old Wiring (If Applicable)
- Desolder existing connections from the 3 way switch, pickups, and pots.
- Label wires if reusing components to avoid confusion.
2️⃣ Identify Switch Terminals
Most Ibanez 3 way switches have 3 lugs (input, neck, bridge).
- Common lug (output) → Center terminal (connects to volume pot).
- Neck pickup lug → Left terminal (position 1).
- Bridge pickup lug → Right terminal (position 3).
- Middle position → Activates both pickups (position 2).
📌 Refer to your Ibanez wiring diagram 3 way switch for exact terminal layout.
3️⃣ Solder Pickups to the Switch
- Neck pickup hot wire → Solder to the left terminal.
- Bridge pickup hot wire → Solder to the right terminal.
- Ground wires → Connect to the back of the volume pot.
4️⃣ Connect the Switch to Volume/Tone Controls
- Common lug (center terminal) → Solder to the input lug of the volume pot.
- Ground the switch → Solder a wire from the switch casing to the pot’s back.
5️⃣ Test Continuity Before Finalizing
- Use a multimeter to check:
- Position 1 (neck) → Should show continuity between common and neck lug.
- Position 3 (bridge) → Should show continuity between common and bridge lug.
- Position 2 (middle) → Should connect to both lugs.
6️⃣ Secure & Reassemble
- Tidy up wiring with zip ties or heat shrink tubing.
- Reattach pickguard/control cover and test the guitar.
📜 Modify the Ibanez wiring diagram 3 way switch accordingly for these setups.
⚡ Advanced Ibanez 3 Way Switch Modifications
Here are some advanced modifications for Ibanez 3 Way Switch
🎛️ Coil Splitting with a 3 Way Switch
Some players modify their Ibanez 3 way switch wiring to include coil splitting, converting humbuckers into single-coil sounds.
Wiring Steps:
- Identify the humbucker’s coil tap wire (usually a fourth wire).
- Connect the coil tap to a push-pull potentiometer or a mini-toggle switch.
- Integrate with the existing Ibanez 3 way switch wiring for versatile tonal options.
🔌 Series/Parallel Switching
Another popular Ibanez wiring diagram 3 way switch modification is series/parallel switching, altering how pickups interact for thicker or clearer tones.
| Mode | Sound Characteristics | Wiring Setup |
|---|---|---|
| Series | Thicker, louder output | Pickups wired sequentially |
| Parallel | Brighter, cleaner tone | Pickups wired side by side |
🛠️ Troubleshooting Ibanez 3 Way Switch Issues
Common problems with Ibanez 3 way switch wiring include:
- Intermittent signal loss → Check for loose solder joints.
- Dead positions → Verify switch contacts are clean.
- Hum/noise → Ensure proper grounding in the Ibanez wiring diagram 3 way switch.
🔍 Testing Your 3 Way Switch
- Use a multimeter to check continuity between terminals.
- Listen for crackling sounds when toggling—indicates dirty contacts.
- Re-solder weak connections if signal cuts out.
🎸 Popular Ibanez Models Using 3 Way Switch Wiring
Many Ibanez guitars use a 3 way switch, including:
- Ibanez RG550 (H-S-H configuration)
- Ibanez S670 (H-H setup)
- Ibanez AZ Series (with additional switching options)
Each model may have slight variations in the Ibanez wiring diagram 3 way switch, so always refer to the correct schematic.
🎸 Conclusion:
By following this comprehensive guide, you now have the expertise to wire, modify, and troubleshoot your Ibanez 3-way switch like a pro. Whether you’re installing new pickups, fixing a faulty connection, or experimenting with advanced mods like coil splitting or series/parallel switching, proper wiring ensures optimal tone, reliability, and performance.
🔑 Key Takeaways:
✅ Understand the standard Ibanez 3-way switch wiring diagram for seamless pickup switching.
✅ Use high-quality soldering techniques to prevent signal loss or noise.
✅ Test continuity with a multimeter to confirm correct connections before final assembly.
✅ Explore advanced modifications (coil splits, series/parallel) for expanded tonal versatility.
✅ Troubleshoot common issues (crackling, dead spots, hum) with confidence.
For additional wiring diagrams and customization options, check out this excellent resource:
🔗 Guitar Electronics
🎶 Final Tip:
Always double-check your connections and refer to manufacturer specs for your specific Ibanez model. With the right wiring setup, your guitar will deliver studio-quality tones for years to come.
🔥 Ready to take your guitar’s electronics to the next level? Start soldering and unleash your sound! 🎸⚡
❓ Frequently Asked Questions (FAQs)
Here are some frequently asked questions about Ibanez 3 way switch
1. What does the Ibanez 3 way switch do?
The Ibanez 3 way switch toggles between neck, bridge, or both pickups, offering different tonal options.
2. Can I add coil splitting to my Ibanez 3 way switch?
Yes! By modifying the Ibanez wiring diagram 3 way switch, you can integrate coil splitting for single-coil tones.
3. Why is my Ibanez 3 way switch crackling?
Dirty or worn contacts cause crackling—clean the switch with contact cleaner or replace it.
4. How do I wire an Ibanez 3 way switch for HSH configuration?
Follow the Ibanez wiring diagram 3 way switch for HSH setups, ensuring proper grounding and pickup connections.
5. Where can I find an official Ibanez 3 way switch wiring diagram?
Check Ibanez’s support site or guitar forums for exact schematics matching your model.
By mastering the Ibanez wiring diagram 3 way switch, you unlock endless tonal possibilities! 🎶🔋
Ibanez 3-Way Switch Quick Links
Diagrams
Mods & Repairs
Parts
More help? Ibanez Tech 🛠️