Installing a 3-way switch is a fundamental skill for controlling lights from multiple locations. Whether you’re managing stairway lighting, hallway fixtures, or large rooms, understanding 3-way switch wiring ensures convenience, safety, and proper functionality.
This guide provides detailed, step-by-step instructions with clear explanations, safety precautions, and troubleshooting tips.
⚡ Understanding 3-Way Switches
A 3-way switch allows you to control a single light fixture from two different locations. Unlike a standard single-pole switch, a 3-way switch system uses:
- Two specially designed switches
- Three terminal screws per switch (common, traveler 1, traveler 2)
- Traveler wires (typically red or black) connecting the switches
🔧 Key Components in a 3-Way Switch Setup
| Component | Purpose | Wire Color (Typical) |
|---|---|---|
| Common Terminal | Connects to power or light | Black screw |
| Traveler Wires | Link the two switches | Red or black |
| Neutral Wire | Completes the circuit | White |
| Ground Wire | Safety connection | Green or bare copper |
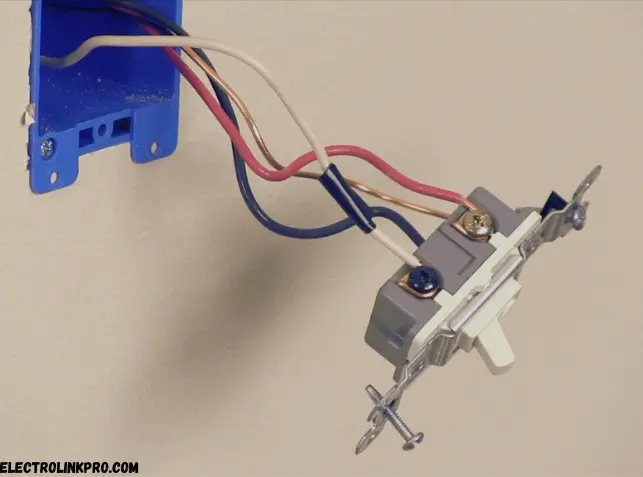
Wiring Diagram For a 3 way switch
Here is wiring diagram below for a 3-way switch

🛠️ Step-by-Step Wiring Instructions
1. Safety Precautions & Tools Needed
⚠️ Always turn off the circuit breaker before working!
Essential Tools:
- Non-contact voltage tester
- Screwdrivers (flathead & Phillips)
- Wire strippers
- Needle-nose pliers
- Electrical tape
2. Identify Wiring in the Switch Boxes
Typical Wiring Setup:
- Power Source (Line Wire) – Comes from the breaker panel (usually black)
- Load Wire – Goes to the light fixture (black)
- Traveler Wires – Connect between switches (red or black)
- Neutral Wires – White wires bundled together
- Ground Wires – Green or bare copper
🔹 Use a voltage tester to confirm power is off!
3. Wiring the First 3-Way Switch
- Connect the Hot (Line) Wire
- Attach the black (hot) wire to the common terminal (black screw).
- Attach Traveler Wires
- Connect the two traveler wires (red and/or black) to the brass screws.
- Secure Ground Wire
- Fasten the bare/green wire to the green grounding screw.
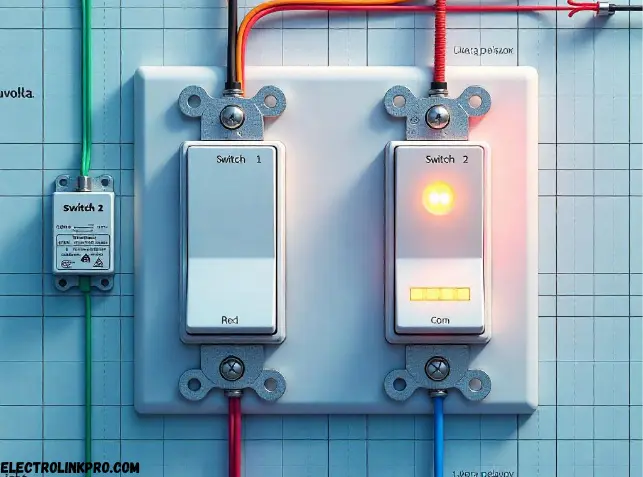
4. Wiring the Second 3-Way Switch
- Connect the Load Wire
- Attach the black wire (going to the light) to the common terminal (black screw).
- Link Traveler Wires
- Match the traveler wires to the same terminals as the first switch.
- Ground the Switch
- Connect the ground wire to the green screw.
5. Testing the Circuit
✅ Restore power and test both switches:
- Both switches should turn the light on/off independently.
- If not working, recheck traveler wire connections.
🔍 Common Wiring Mistakes & Fixes
| Issue | Cause | Solution |
|---|---|---|
| Light doesn’t turn on | Incorrect common wire connection | Verify hot wire is on the common terminal |
| Only one switch works | Traveler wires swapped | Swap traveler connections |
| Switch sparks or trips breaker | Loose or crossed wires | Double-check all connections |
🔄 Alternative Wiring Methods
1. Power at the Light Fixture
- The hot wire feeds into the light first, then branches to switches.
2. Power at the Switch Box
- The hot wire connects to the first switch before reaching the light.
3. Smart 3-Way Switches
📲 Some smart switches (like Lutron Caséta) require only one smart switch in a 3-way setup.
� Pro Tips for Reliable Installation
✔ Label wires before disconnecting old switches.
✔ Use wire nuts for secure connections.
✔ Follow NEC (National Electrical Code) for compliance.
� Conclusion
Wiring a 3-way switch is manageable with the right knowledge. Always prioritize safety, verify connections, and test before finalizing. For complex setups, consult a licensed electrician.
❓ FAQs About 3-Way Switches
1. Can I use a dimmer with a 3-way switch?
✅ Yes, but ensure the dimmer is 3-way compatible (e.g., Lutron Maestro).
2. What if my 3-way switch isn’t working?
🔧 Check traveler wire connections and ensure the common terminal is correct.
3. Can I install a 3-way switch with only two wires?
❌ No, a 3-way switch requires three wires (common + two travelers).
4. Are smart switches compatible with 3-way setups?
📲 Yes, but check if the model supports 3-way wiring (e.g., TP-Link Kasa).
5. What’s the difference between a 3-way and 4-way switch?
🔄 A 3-way switch works with two switches, while a 4-way switch allows control from three or more locations.
Some Useful Official Links:
- National Electrical Code (NEC) Guidelines
- OSHA Electrical Safety Standards
- UL (Underwriters Laboratories) Safety Tips
- Energy Star Certified Lighting & Switches
- Lutron (Leading Switch Manufacturer) Wiring Guides
- IEEE (Institute of Electrical and Electronics Engineers) Standards
These links provide code-compliant, safety-approved, and manufacturer-recommended guidance for professional electrical work. Always verify local regulations before installation. ⚡