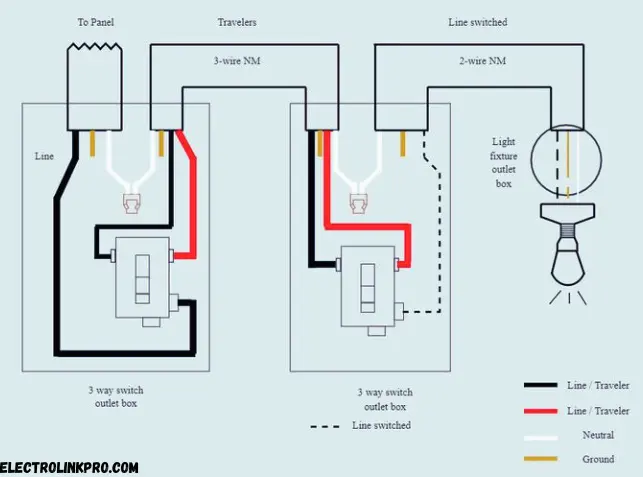
Installing a 3-way switch wiring diagram correctly allows you to control a single light from two different locations—perfect for stairways, hallways, and large rooms. This guide provides a step-by-step breakdown, including diagrams, common mistakes, and troubleshooting tips.
📌 Essential Components & Wiring Basics
Before installation, understand these key elements in a 3-way switch setup:
🔧 Components Needed for 3-Way Switch Wiring Diagram
| Part | Purpose |
|---|---|
| Two 3-Way Switches | Allow control from two locations. |
| Light Fixture | The bulb or fixture being controlled. |
| Power Source (Hot Wire) | Supplies electricity (usually black). |
| Neutral Wire (White) | Completes the circuit. |
| Ground Wire (Green/Bare) | Prevents electrical shocks. |
| Traveler Wires (Red/Black) | Connects the two switches. |
⚡ How a 3-Way Switch Works
- Switch 1 sends power through traveler wires to Switch 2.
- Switch 2 directs power to the light fixture when toggled.
- Both switches must be correctly wired to the common (COM) terminal for proper function.
🔌 Step-by-Step 3-Way Switch Wiring Diagram
1. Standard Wiring (Power at First Switch)
✅ Best for: New installations where power enters at the first switch.
🔧 Detailed 3-Way Switch Wiring Steps
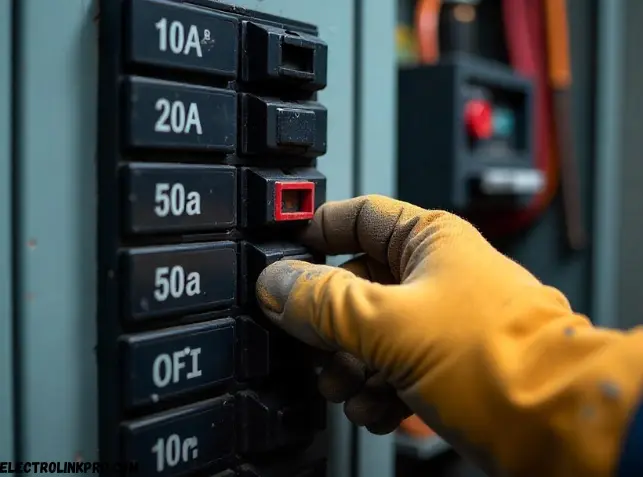
1. Turn Off Power at the Breaker
⚠️ Safety First:
- Locate your home’s electrical panel.
- Identify the correct circuit breaker controlling the switches/light.
- Flip the breaker to the OFF position.
- Verify power is off using a non-contact voltage tester at the switch box.
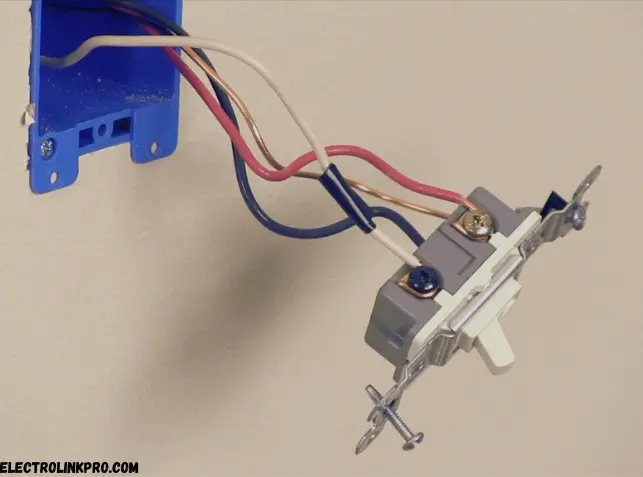
2. Connect the Hot Wire to the COM Terminal on Switch 1
🔌 Terminal Identification:
- COM (Common Terminal): Usually a darker screw (black or copper-colored).
- Traveler Terminals: Brass screws (for red & black wires).
📌 Steps:
- Remove the existing switch (if replacing).
- Identify the hot (live) wire (usually black) coming from the power source.
- Loosen the COM terminal screw on Switch 1.
- Insert the hot wire and tighten securely.
3. Run a 3-Wire Cable Between Switches
🔄 Cable Requirements:
- 14/3 or 12/3 NM-B Cable (for 15A or 20A circuits).
- Contains:
- Black wire (traveler)
- Red wire (traveler)
- White wire (neutral)
- Bare/green wire (ground)
📌 Installation of 3-Way Switch Wiring Diagram:
- Measure and cut the cable between the two switch boxes.
- Feed the cable through walls/ceilings using fish tape if needed.
- Leave 6-8 inches of extra wire in each box for connections.
- Strip 1/2 inch of insulation from each wire end.
4. Link Traveler Wires to Brass Screws on Both Switches
🔀 Traveler Wire Connections:
- Switch 1:
- Connect black traveler to one brass screw.
- Connect red traveler to the other brass screw.
- Switch 2:
- Mirror the same connections (black-to-black, red-to-red).
📌 Pro Tip:
- Traveler wires are interchangeable—consistency matters, but polarity does not.
5. Connect Switch 2’s COM Terminal to the Light Fixture
💡 Final Power Path:
- The COM terminal on Switch 2 sends power to the light when toggled.
📌 Steps:
- Identify the black wire going to the light fixture.
- Connect it to the COM terminal on Switch 2.
- Secure with a screwdriver (no loose connections).
6. Attach Neutral (White) and Ground (Green) Wires
⚡ Completing the Circuit:
Neutral Wires (White):
- Switch Boxes:
- Connect all white wires with a wire nut.
- If using smart switches, pigtail to the switch’s neutral terminal.
Ground Wires (Green/Bare):
- Switch 1 & 2:
- Twist together all ground wires.
- Attach to the green ground screw on each switch.
- For metal boxes, add a pigtail to the box’s ground screw.
🔍 Verification & Testing of 3-Way Switch Wiring Diagram
✅ Before Restoring Power:
- Double-check all wire connections.
- Ensure no exposed copper is visible outside terminals.
- Tuck wires neatly into boxes.
🔌 Testing:
- Turn the breaker ON.
- Test both switches—the light should toggle from either location.
- If issues occur, recheck traveler and COM connections.
📌 Diagram Summary:
Breaker → Switch 1 (COM) → Travelers → Switch 2 (COM) → Light2. Power at Light Fixture (Alternate Method)
✅ Best for: Renovations where power runs to the light first.
🔧 Wiring Steps
- Connect hot wire (black) to the light fixture.
- Run a 3-wire cable to Switch 1.
- Link travelers between both switches.
- Connect Switch 2’s COM terminal back to the light.
📌 Diagram Summary:
Breaker → Light → Switch 1 → Travelers → Switch 2 → Back to Light⚠️ Common Mistakes & Fixes
| Problem | Cause | Solution |
|---|---|---|
| Light doesn’t turn on | Wrong COM terminal connection | Verify hot wire is on COM. |
| Only one switch works | Traveler wires swapped | Check red & black wire connections. |
| Flickering light | Loose wire or bad switch | Tighten connections or replace switch. |
| Buzzing/humming sound | Faulty dimmer or overload | Use compatible dimmer or check wattage. |
🚀 Advanced Configurations of 3-Way Switch Wiring Diagram
1. Adding Multiple Lights
- Wire extra fixtures in parallel from the main light.
- Ensure total wattage doesn’t exceed circuit limits.
2. Smart 3-Way Switches (Wi-Fi/Zigbee)
- Replace one switch with a smart switch (e.g., Lutron, Kasa).
- Use a wireless remote for the second location (no rewiring needed).
🔧 Troubleshooting Checklist
❑ Power off at the breaker before working.
❑ Test wires with a voltage tester.
❑ Check traveler wire connections (should match on both switches).
❑ Ensure ground wires are properly secured.
✅ Conclusion: Master Your 3-Way Switch Setup
A properly installed 3-way switch wiring diagram ensures seamless lighting control. Always double-check connections and test before finalizing.
📢 Need help? Consult a licensed electrician for complex setups!
❓ FAQs (Quick Answers)
1. Can I use a dimmer with a 3-way switch?
✅ Yes, but only if the dimmer is 3-way compatible (check specs).
2. Why is my 3-way switch not working?
🔧 Check:
- Traveler wire connections
- Correct COM terminal wiring
- Power supply
3. What’s the difference between 3-way and 4-way switches?
- 3-way: Two switches control one light.
- 4-way: Three+ switches control one light (adds extra switches between).
4. Can I install a 3-way switch without a neutral wire?
⚠️ Most smart switches need neutral—check manufacturer instructions.
5. What wire colors are used in 3-way switches?
- Hot: Black
- Travelers: Red & Black
- Neutral: White
- Ground: Green/Bare
Some useful links:
1. Official Resources:
- National Electrical Code (NEC) Guidelines – NFPA.org
- OSHA Electrical Safety Standards – OSHA.gov
2. Manufacturer Guides:
3. DIY Tutorials: