Installing a 3-way switch correctly allows you to control lights from two locations—perfect for hallways, staircases, or large rooms. This comprehensive guide provides step-by-step wiring instructions, diagrams, troubleshooting tips, and safety precautions to ensure a flawless installation.
⚡ Step-by-Step 3-Way Switch Wiring Schematic
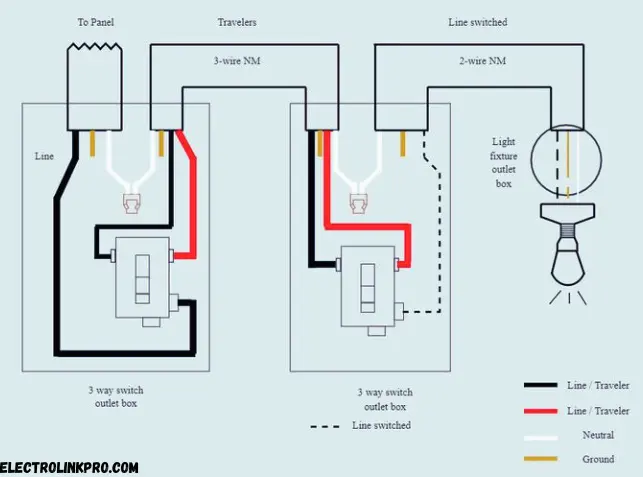
1️⃣ Understanding the 3-Way Switch Setup
A 3-way switch wiring schematic involves:
✔ Two switches controlling one light.
✔ Three terminal screws per switch:
- Common (black screw) → Connects to power or light.
- Travelers (brass screws) → Carry current between switches.
- Ground (green screw) → Safety grounding.
Wiring Diagram:
🔧 Wiring Steps
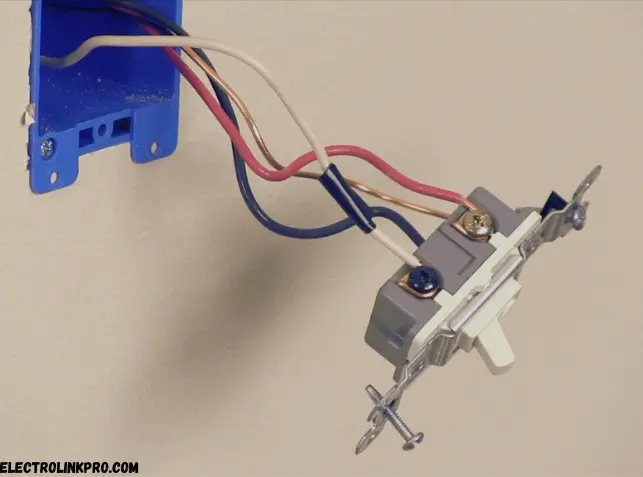
Step 1: Identify Wires
| Wire Color | Purpose |
|---|---|
| Black (Hot) | Live power from breaker |
| White | Neutral (to light) |
| Red & Black | Travelers (between switches) |
| Bare/Ground | Safety ground |
Step 2: Connect Power to First Switch
- Hot wire (black) → Common terminal (black screw) of Switch 1
- Neutral (white) → Wire nut with other neutrals in box
- Ground (bare) → Green screw on Switch 1
Step 3: Run 3-Wire Cable Between Switches
- Connect red and black travelers to brass screws on both switches
- White wire = neutral (not used between switches)
Step 4: Wire Second Switch
- Travelers (red/black) → Brass screws
- Common terminal (black screw) → Connects to black wire going to light
- Ground → Green screw
Step 5: Connect Light Fixture
- Black wire from Switch 2 → Light hot terminal
- White neutrals wire-nut together
- Ground to fixture ground
🔃 Alternative Configuration (Power at Light)
| Step | Action |
|---|---|
| 1 | Hot wire connects to light first |
| 2 | Neutral splices in light box |
| 3 | Travelers run between switches |
| 4 | Common terminal on Switch 2 connects to hot |
✅ Testing & Troubleshooting
- Restore power and test both switches
- If lights don’t work:
- Check traveler connections (must be on brass screws)
- Verify common terminal has correct hot/load wire
- Test continuity with multimeter
📊 Wiring Diagrams Comparison
| Scenario | Key Difference |
|---|---|
| Power at Switch | Hot connects to Switch 1 first |
| Power at Light | Hot feeds light fixture first |
⚠️ Critical Mistakes to Avoid
- Never mix up common/terminal screws → Causes switches to malfunction
- Don’t use white wire as hot → Must re-mark with tape if repurposed
- Secure all wire nuts → Loose connections cause arcing
🎓 Pro Tips
✔ Label all wires before disconnecting old switches
✔ Use a voltage tester before touching wires
✔ Take photos of original wiring for reference
📊 3-Way vs. 4-Way Switch Comparison
| Feature | 3-Way Switch | 4-Way Switch |
|---|---|---|
| Number of Switches | 2 | 3+ |
| Control Points | 2 locations | 3+ locations |
| Wiring Complexity | Moderate | High |
| Best For | Hallways, stairs | Large rooms, multiple entries |
🚨 Common Mistakes & Fixes
| Mistake | Why It Happens | How to Fix |
|---|---|---|
| Wrong traveler wire connections | Miswiring brass terminals | Ensure red & black wires connect to brass screws |
| Mixed-up common terminal | Black screw not connected properly | Connect power/light to the common terminal |
| Loose grounding | Poor screw tightening | Secure ground wire to green screw |
✅ Pro Tips for a Perfect Installation
✔ Label wires before disconnecting old switches.
✔ Use a voltage tester to prevent shocks.
✔ Match wire gauge (12/2 for 20A, 14/2 for 15A).
✔ Secure all connections with wire nuts & tape.
Conclusion:
Installing a 3-way switch system correctly ensures convenient lighting control from multiple locations while maintaining electrical safety. This guide has provided a step-by-step wiring process, detailed diagrams, and professional tips to help you:
✅ Understand the Circuit – Recognize the roles of common terminals, traveler wires, and grounding in a 3-way switch setup.
✅ Follow Correct Wiring Methods – Whether power enters at the first switch or the light fixture, proper connections prevent malfunctions.
✅ Avoid Common Mistakes – Miswiring travelers, mixing up terminals, or poor grounding can lead to failures—always double-check connections.
✅ Test & Troubleshoot – Use a voltage tester to verify wiring before restoring power.
Final Recommendations:
- Label wires before disconnecting old switches for easier reinstallation.
- Follow NEC codes for wire gauge (12 AWG for 20A circuits, 14 AWG for 15A).
- Use quality tools (non-contact testers, wire strippers) for safe, professional results.
By applying these principles, you can confidently install reliable, code-compliant 3-way switches in homes or commercial spaces.
🔧 Ready to wire? Always turn off power at the breaker first!
Need Further Help?
📘 Reference Guides: NEC Electrical Standards
🎥 Visual Tutorials: 3-Way Switch Wiring Video
❓ Frequently Asked Questions (FAQs)
1. Can I use a 3-way switch as a single-pole?
Yes, but only one traveler terminal will be used—less efficient than a dedicated single-pole switch.
2. Why do my 3-way switches not work?
Check traveler wire connections—miswiring is the most common issue.
3. What cable is needed for 3-way switches?
Use 14/3 or 12/3 NM cable (includes black, red, white, and ground wires).
4. Can I add a dimmer to a 3-way switch?
Yes, but ensure the dimmer is 3-way compatible—some require a secondary remote switch.
5. How do I troubleshoot a faulty 3-way switch?
- Check for loose wires.
- Test voltage at each switch.
- Verify proper grounding.
Useful 3-Way Switch Links:
🔗 Wiring Guides:
- Home Depot Guide (Steps + Pics)
- Family Handyman (Simple Tutorial)
⚡ Safety & Codes:
- NEC Standards (Official Rules)
🛠️ Tools & Fixes:
- Best Testers (Safety Gear)
- Troubleshooting (Quick Fixes)
▶ Video Help:
- YouTube Demo (Visual Walkthrough)
All direct links—no fluff! 🔌