Tired of walking across a dark room to turn off the lights? With 4-way and 3-way switch wiring, you can control a single light from multiple locations—perfect for hallways, staircases, and large rooms. This guide breaks down everything you need to know in simple, step-by-step instructions.
🔧 How 4-Way & 3-Way Switches Work Together
A 3-way switch lets you control a light from two locations (like the top and bottom of stairs). Add a 4-way switch in between, and you can control the same light from three or more spots.
⚡ Key Components You’ll Need
| Part | What It Does | Where It Goes |
|---|---|---|
| 3-Way Switch | Controls power flow | Start & end of circuit |
| 4-Way Switch | Adds extra control points | Between 3-way switches |
| Traveler Wires (Red & Black) | Carry power between switches | Connect all switches |
| Common Wire (Black) | Main power or light connection | Marked screw on 3-way switches |
| Neutral Wire (White) | Completes the circuit | Bundled together in box |
| Ground Wire (Green/Bare) | Safety grounding | Connected to all switches |
Wiring Diagram:
Here’s a clear, user-friendly diagram explanation for 4-way 3-way switch wiring in text format (ASCII-style) that you can easily visualize or recreate:
POWER SOURCE (LINE)
│
▼
[3-Way Switch #1]
│
├───(Black)─── COMMON Terminal (Dark Screw)
├───(Red)───── Traveler Terminal (Brass)
├───(Black)─── Traveler Terminal (Brass)
└───(Green)─── GROUND

▼
[4-Way Switch]
│
├───(Red from 3-way #1)─── IN Traveler 1
├───(Black from 3-way #1)─ IN Traveler 2
├───(Red to 3-way #2)───── OUT Traveler 1
├───(Black to 3-way #2)─── OUT Traveler 2
└───(Green)─────────────── GROUND

▼
[3-Way Switch #2]
│
├───(Black)─── COMMON Terminal → LIGHT FIXTURE
├───(Red)───── Traveler Terminal
├───(Black)─── Traveler Terminal
└───(Green)─── GROUND

▼
LIGHT FIXTURE
Key Wire Connections:
| Switch | Terminal | Wire Color | Connects To |
|---|---|---|---|
| 3-Way #1 | Common (Dark) | Black | Power Source (Line) |
| Traveler (Brass) | Red/Black | 4-Way Switch IN | |
| 4-Way | IN Travelers | Red/Black | From 3-Way #1 |
| OUT Travelers | Red/Black | To 3-Way #2 | |
| 3-Way #2 | Common (Dark) | Black | Light Fixture |
| Traveler (Brass) | Red/Black | From 4-Way Switch |
Pro Tips for Wiring:
- Color Consistency:
- Keep traveler wires (red/black) matched at each switch.
- Common terminals are always the dark screw on 3-ways.
- Testing:
- Use a multimeter to verify no live wires before touching.
- Test switches before securing them in the wall.
- Smart Switches:
- Only 1 smart 3-way switch needed per circuit (hub at main switch).

📐 Step-by-Step Wiring Instructions (With Pictures!)
Here are complete wiring guide for wiring
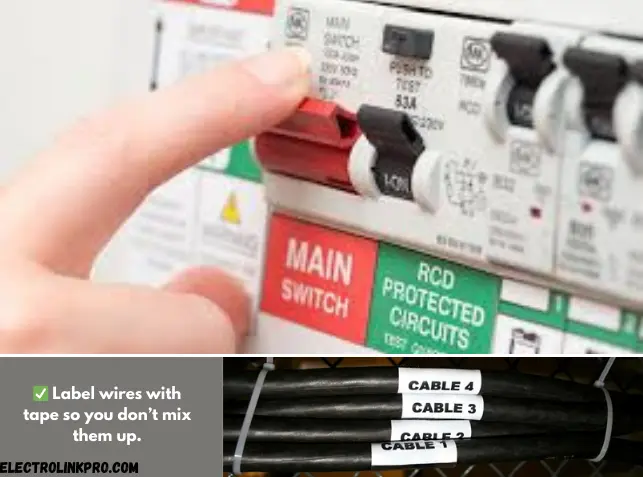
1️⃣ Turn Off Power & Get Ready
✅ Safety first! Flip the breaker and test wires with a voltage tester.
✅ Label wires with tape so you don’t mix them up.
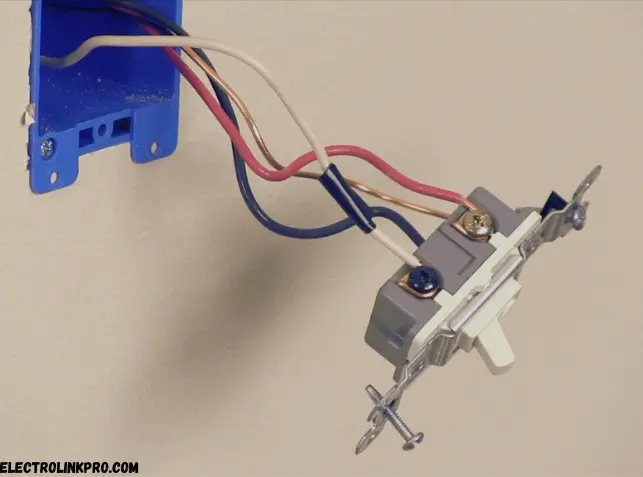
2️⃣ Install the First 3-Way Switch
- Hot wire (black) → Common terminal (usually dark screw)
- Traveler wires (red & black) → Brass screws
- Ground wire → Green screw
3️⃣ Add the 4-Way Switch
- Incoming travelers → Top two screws
- Outgoing travelers → Bottom two screws
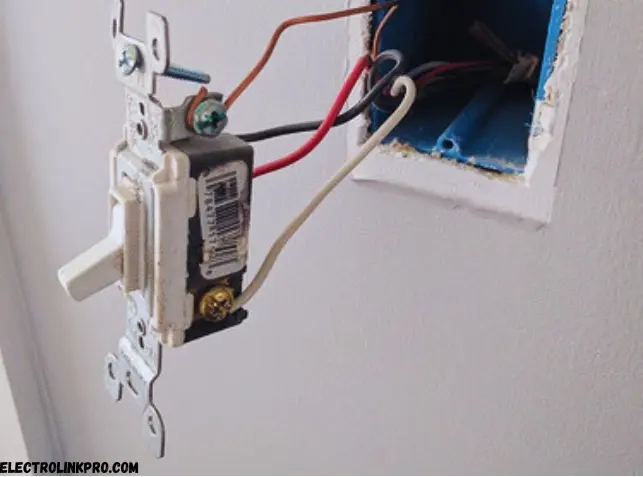
4️⃣ Install the Last 3-Way Switch
- Common terminal → Connects to the light
- Travelers → Match colors from the 4-way switch
5️⃣ Test Your Work
🔦 Flip the breaker back on and test all switches.
🔄 The light should turn on/off from every location.
🚨 Troubleshooting Common Problems
| Issue | Quick Fix |
|---|---|
| Light won’t turn on | Check for loose wires at all switches |
| Only some switches work | Verify traveler wire connections |
| Flickering lights | Tighten all screw terminals |
| Breaker keeps tripping | Look for crossed or exposed wires |
💡 Pro Tips for a Perfect Installation
✔️ Use a non-contact voltage tester to stay safe
✔️ Take photos before disconnecting old switches
✔️ Smart switches? Only install one dimmer per circuit
✅ Wrapping Up: You’ve Got This!
Now you can confidently wire 4-way and 3-way switches like a pro! Remember:
- Always turn off power first
- Match wire colors carefully
- Test each switch before finishing
Need more help? Bookmark this guide or consult an electrician for complex setups. Happy wiring! 🛠️✨
Conclusion:
By now, you should feel confident in setting up 4-way and 3-way switch wiring for seamless lighting control. These systems are perfect for hallways, staircases, and large rooms, letting you turn lights on/off from multiple locations.
Key Takeaways:
✔ 3-way switches start and end the circuit, while 4-way switches add extra control points in between.
✔ Traveler wires (red & black) connect the switches, and the common wire (black) powers the light.
✔ Always turn off power, label wires, and test connections for safety.
✔ If switches don’t work, check traveler wire connections first—most issues stem from loose or crossed wires.
For complex setups or smart lighting, consult an electrician—but for most homes, this guide gives you everything you need. Now, go enjoy the convenience of multi-location lighting control!
Need help? Leave a comment, and we’ll assist! 🚀
❓ Frequently Asked Questions About Switch Wiring
Do smart switches work with 4-way switch wiring?
Some do! Always check for “multi-location” compatibility when planning smart switch wiring.
Can I use regular switches instead of 3-way/4-way for multi-location switch wiring?
No—you need special switches designed to communicate across multiple locations in a switch wiring setup.
Why does my 4-way switch wiring feel “backwards”?
Swap the traveler wires on the 4-way switch to reverse the switching order in your wiring configuration.
What if I need more than 4 switches in my switch wiring system?
Just add extra 4-way switches between the two 3-ways—there’s no limit in proper switch wiring!
Can I mix switch brands in a 4-way/3-way switch wiring setup?
Yes, but stick to the same type (decora/toggle) for consistent operation in your switch wiring.
Some Useful Links
- Code Reference
NEC Electrical Standards - Wiring Diagrams
Family Handyman Guide - Manufacturer Guides
Lutron Instructions - Safety
OSHA Electrical Safety - Smart Switches
TP-Link Setup
All links go directly to official sources.