Installing a 3-way switch wiring schematic correctly ensures seamless control of lights from two different locations. Whether you’re upgrading your home lighting or troubleshooting an existing setup, this guide covers everything—from wiring diagrams to step-by-step installation tips
🔧 How a 3-Way Switch Works
- Switch 1 and Switch 2 communicate via traveler wires (usually brass-colored screws).
- The common terminal (black screw) connects to either the power source or the light.
- Flipping either switch toggles the light on/off.
📊 3-Way Switch Wiring Schematic Comparison
| Wiring Method | Best For | Complexity Level |
|---|---|---|
| Power at Switch 1 | New installations | Moderate |
| Power at Light Fixture | Retrofitting old wiring | Advanced |
| Dead-End 3-Way | Limited cable access | High |
🛠️ Components Needed for a 3-Way Switch Setup
Before wiring a 3-way switch schematic, gather these essentials:
| Component | Purpose | Quantity |
|---|---|---|
| 3-Way Switches | Control light from two locations | 2 |
| 14/3 or 12/3 NM Cable | Carries traveler & neutral wires | As needed |
| Electrical Boxes | Houses switches & connections | 2+ |
| Wire Nuts | Secures wire connections | 4-6 |
| Voltage Tester | Ensures safe wiring | 1 |
⚠️ Safety Tip: Always turn off power at the breaker before working!
Wiring Diagram for a 3 way switch

Step-by-Step 3-Way Switch Wiring Schematic Guide
1️⃣ Power at Switch 1 Wiring Method (Most Common)
Step 1: Connect Power to Switch 1
- Attach the hot wire (black) to the common terminal (black screw).
- Connect the neutral (white) and ground (green/bare) wires.
Step 2: Run 3-Wire Cable Between Switches
- Link Switch 1 and Switch 2 using 14/3 cable.
- The red & black wires are travelers; the white is neutral.
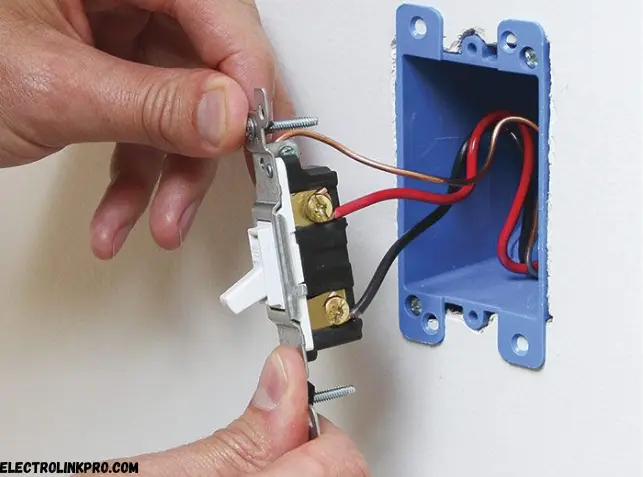
Step 3: Wire Switch 2 to the Light
- Connect the common terminal to the light fixture’s hot wire.
- Secure all connections with wire nuts.
✅ Test: Flip switches to ensure smooth operation.
2️⃣ Power at Light Fixture Wiring Method
- Power feeds into the light first, then branches to switches.
- Requires careful neutral wire handling.
3️⃣ Dead-End 3-Way Wiring
- Used when one switch has no direct power feed.
- Requires a 4-wire setup (including neutral).

🚧 Troubleshooting Common 3-Way Switch Issues
| Problem | Possible Cause | Solution |
|---|---|---|
| Light Doesn’t Turn On | Loose traveler wire | Recheck connections |
| Flickering Lights | Faulty switch or poor wiring | Replace switch |
| Only One Switch Works | Miswired common terminal | Rewire correctly |
🔍 Pro Tip: Use a voltage tester to verify live wires before troubleshooting.
Conclusion:
Installing or troubleshooting a 3-way switch wiring schematic may seem daunting at first, but with the right knowledge, tools, and attention to detail, you can achieve flawless lighting control in your home. This guide has walked you through the fundamentals, components, step-by-step wiring methods, and troubleshooting tips—ensuring you have all the information needed for a successful installation.
🔑 Key Takeaways for a Perfect 3-Way Switch Setup
✅ 1. Understand the Basics
- A 3-way switch wiring schematic allows control of a single light from two locations.
- The system relies on two 3-way switches, connected via traveler wires, with a common terminal that routes power correctly.
✅ 2. Use the Right Components
- 14/3 or 12/3 NM Cable is essential for carrying traveler and neutral wires.
- Always verify switch compatibility (especially if using smart switches or dimmers).
✅ 3. Follow the Correct Wiring Method
- Power at Switch 1 (most common for new installations).
- Power at Light Fixture (better for retrofitting older wiring).
- Dead-End 3-Way Wiring (used when one switch lacks direct power).
✅ 4. Test Before Finalizing
- Always check connections with a voltage tester before restoring power.
- Flip switches multiple times to ensure smooth operation.
✅ 5. Troubleshoot Effectively
Flickering lights may indicate a loose connection or faulty switch.
If lights don’t turn on, check traveler wire connections.
If only one switch works, verify the common terminal wiring.
❓ FAQs on 3-Way Switch Wiring Schematic
1. Can I use a dimmer with a 3-way switch?
Yes, but ensure you buy a 3-way compatible dimmer.
2. Why are my 3-way switches not working?
Check traveler wire connections—they’re often the culprit.
3. Can I install a 3-way switch with only 2 wires?
No, you need at least 3 wires (including a traveler).
4. What’s the difference between a 3-way and 4-way switch?
A 4-way switch adds a third (or more) control point.
5. Is a 3-way switch wiring schematic required by code?
Yes, proper wiring ensures safety & compliance with NEC standards.
Here are some authoritative and useful official links related to 3-way switch wiring schematics from trusted sources:
🔧 Electrical Codes & Standards
- NEC (National Electrical Code) – NFPA 70
- OSHA Electrical Safety – OSHA Standards
🏠 DIY & Wiring Guides
- Home Depot Wiring Guide – 3-Way Switch Installation
- Lutron (Switch Manufacturer) – 3-Way Wiring Diagrams
⚡ Safety & Troubleshooting
- CPSC (Consumer Product Safety Commission) – Electrical Safety Tips
- UL Solutions (Certification) – Electrical Product Safety
📐 Engineering References
- IEEE Wiring Standards – IEEE Power & Energy Society