Installing a 3-way switch wiring setup allows you to control a single light from two different locations—ideal for staircases, hallways, and large rooms. This guide provides a detailed 3-way switch wiring diagram, step-by-step instructions, and expert tips to ensure flawless installation.
Whether you’re a DIY enthusiast or an electrician, mastering 3-way switch wiring is essential for flexible lighting control. Below, we break down wiring configurations, tools needed, common mistakes, and troubleshooting tips.
📋 3-Way Switch Wiring Diagram & Configurations
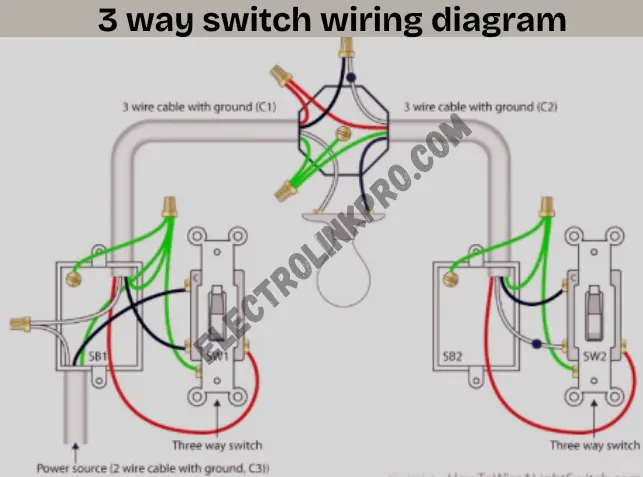
| Wiring Method | Description | Best For |
|---|---|---|
| Power at Switch 1 | Hot wire connects to the first switch’s COM terminal. | New installations with easy access. |
| Power at Light | Hot wire feeds into the light fixture first. | Retrofitting existing setups. |
| Power at Switch 2 | Hot wire connects to the second switch’s COM terminal. | Long-distance wiring setups. |
🔧 Tools & Materials Needed
- Non-contact voltage tester (safety first! ⚠️)
- Screwdrivers & wire strippers
- 14/3 or 12/3 NM cable (for traveler wires)
- Two 3-way switches
⚡ Step-by-Step 3-Way Switch Wiring Installation
1️⃣ Turn Off Power & Verify Safety
Before working on 3-way switch wiring, shut off the circuit breaker and test wires with a voltage tester.
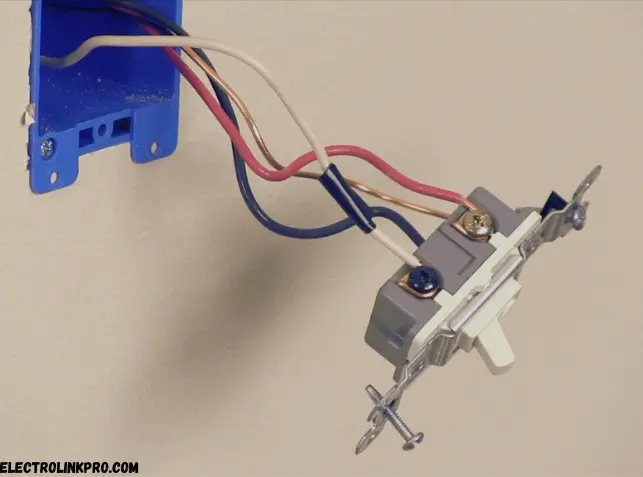
2️⃣ Identify Wires & Terminals
- Black (Hot) wire → COM terminal on the first switch.
- Red & White (Travelers) → T1 & T2 terminals.
- Neutral (White) wire → Connects to the light fixture.
3️⃣ Connect the First 3-Way Switch
- Attach the hot wire to COM.
- Connect travelers to T1 & T2.
- Secure ground wires (green/bare).
4️⃣ Wire the Second 3-Way Switch
- Link travelers to T1 & T2.
- Connect the COM terminal to the light.
5️⃣ Test the Circuit
Restore power and check if both switches control the light properly.

🚫 Common 3-Way Switch Wiring Mistakes & Fixes
❌ Incorrect Traveler Wire Connections
- Fix: Ensure red and white traveler wires are correctly linked between switches.
❌ Mixed-Up Common Terminal
- Fix: The COM terminal must connect to power or the light, not travelers.
❌ Loose Wire Connections
- Fix: Tighten all screws and use wire nuts securely.
🔍 Advanced 3-Way Switch Wiring Tips
✅ Using Smart 3-Way Switches
- Works with Wi-Fi or Zigbee for remote control.
- Requires neutral wire compatibility.
✅ Converting 3-Way to 4-Way (Multi-Location Control)
- Add a 4-way switch between two 3-way switches for extra control points.
Conclusion: Mastering 3-Way Switch Wiring for Optimal Lighting Control
A properly installed 3-way switch wiring system provides unparalleled convenience by allowing a single light fixture to be controlled from two different locations—ideal for staircases, hallways, and large rooms. This guide has provided a detailed, professional-grade wiring diagram, step-by-step installation instructions, and expert troubleshooting tips to ensure a flawless setup.
Understanding the roles of the common (COM) and traveler (T1/T2) terminals, correctly identifying wire colors (black for hot, red and white for travelers, green/bare for ground), and avoiding common mistakes (such as reversed travelers or loose connections) are critical for a safe and functional installation. Whether you’re retrofitting an existing system or implementing a new one, following industry-standard practices—such as proper wire stripping, secure terminal connections, and thorough voltage testing—will guarantee reliable performance. For advanced setups, consider integrating smart 3-way switches or expanding the circuit with 4-way switches for multi-location control.
By adhering to these best practices, you can achieve professional-grade results that enhance both functionality and safety in any residential or commercial space. For further learning, explore our guides on 4-way switch configurations or smart lighting automation to expand your electrical expertise.egration.
❓ Frequently Asked Questions (FAQs)
1. What’s the difference between a 3-way and single-pole switch?
A single-pole switch controls a light from one location, while a 3-way switch allows control from two spots.
2. Can I use a dimmer with 3-way switch wiring?
Yes, but you need a 3-way compatible dimmer switch.
3. Why is my 3-way switch not working after wiring?
Check traveler wire connections and ensure the COM terminal is correctly linked.
4. Do both switches in a 3-way setup need to be the same brand?
No, but matching brands ensure better compatibility.
5. Can I install a 3-way switch without a neutral wire?
Most smart 3-way switches require a neutral, but traditional mechanical ones don’t.
By following this 3-way switch wiring guide, you’ll achieve flawless lighting control! 🚀💡