Installing a 3-way switch wiring diagram correctly ensures seamless control of lights from two different locations. Whether you’re upgrading your home lighting or troubleshooting an existing setup, this guide covers everything—from 3-way switch wiring diagrams to step-by-step installation tips.
By the end, you’ll master 3-way switch wiring diagrams, understand the key components, and avoid common mistakes. Let’s dive in!
🔧 Components Needed for a 3-Way Switch Wiring Setup
Before wiring a 3-way switch, gather these essential parts:
| Component | Purpose |
|---|---|
| Two 3-way switches | Allow control from two locations |
| 14/3 or 12/3 NM cable | Carries traveler wires between switches |
| Light fixture | The controlled lighting source |
| Electrical box | Houses switches and wiring |
| Wire connectors | Secures wire connections |
| Screwdriver & voltage tester | For safe installation |
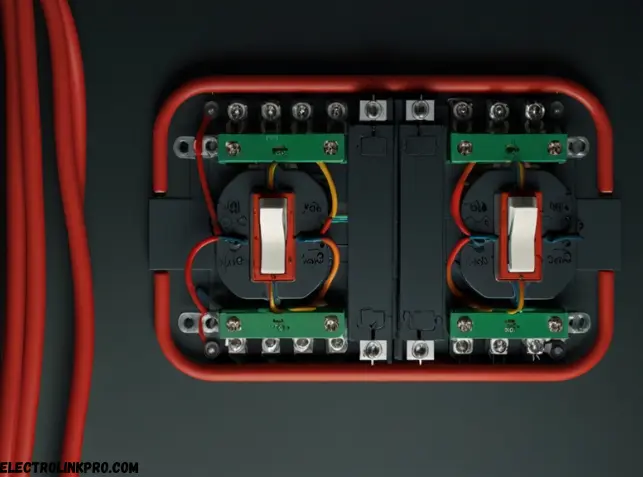
3-way switch wiring diagram
Here is simply defined 3 way switch wiring diagram.
📝 Step-by-Step 3-Way Switch Wiring Diagram Installation
1. Turn Off Power & Verify Safety 🔌
- Shut off the circuit breaker.
- Use a voltage tester to confirm no live current.
2. Identify Wires in the Electrical Box
- Hot wire (black) – Brings power from the panel.
- Neutral wire (white) – Completes the circuit.
- Traveler wires (red & black) – Connect between switches.
- Ground wire (green/bare) – Prevents electrical shocks.
3. Connect the First 3-Way Switch
- Attach the hot wire to the common terminal (dark screw).
- Connect traveler wires (red & black) to the brass screws.
- Secure the ground wire to the green screw.
4. Wire the Second 3-Way Switch
- Link the common terminal to the light fixture.
- Join the traveler wires to the matching terminals.
- Ground the switch properly.
5. Test the 3-Way Switch Wiring
- Restore power and toggle both switches.
- The light should turn on/off from either location.

⚠️ Common Mistakes in 3-Way Switch Wiring Diagrams
Avoid these errors for a flawless 3-way switch wiring diagram setup:
| Mistake | Solution |
|---|---|
| Incorrect traveler wire connections | Ensure red & black wires are on brass screws |
| Loose wire connections | Tighten all screws securely |
| Ignoring the ground wire | Always connect the ground for safety |
| Mixing up common & traveler terminals | Double-check the dark screw (common) |
| Using incorrect cable type | Use 14/3 or 12/3 NM cable for travelers |
🔌 Alternative 3-Way Switch Wiring Methods
1. Power at Light Fixture
- The hot wire feeds the light first, then branches to switches.
- Requires proper neutral connections.
2. Power at Switch Box
- The hot wire enters the first switch box.
- More common in residential wiring.
3. Smart 3-Way Switch Wiring
- Works with Wi-Fi-enabled switches (e.g., Lutron, TP-Link).
- Follow manufacturer guidelines for compatibility.
✅ Troubleshooting a 3-Way Switch Wiring Diagram
If your 3-way switch wiring diagram isn’t working:
- Check for loose wires – Re-tighten all connections.
- Test voltage – Ensure power reaches both switches.
- Inspect traveler wires – Swap if incorrectly connected.
- Verify the common terminal – Must link to power or light.
🔚 Conclusion:
Properly installing a 3-way switch wiring system ensures convenient lighting control from multiple locations while maintaining electrical safety. By following the diagrams, using the correct tools, and avoiding common mistakes, you can achieve a professional-grade installation.
For more complex setups (such as integrating smart switches or 4-way switches), always consult local electrical codes or a licensed electrician. If you’re unsure about any step, double-check connections with a voltage tester before restoring power.
Further Reading
- The Spruce: How to Wire a 3-Way Switch – Detailed guide with illustrations.
- Family Handyman: 3-Way Switch Troubleshooting – Common issues and fixes.
- NFPA Electrical Safety Tips – Important safety standards.
Whether you’re a DIY enthusiast or a professional, understanding 3-way switch wiring enhances your ability to design efficient lighting systems. Always prioritize safety and compliance with electrical regulations.
❓ Frequently Asked Questions (FAQs)
1. What is the difference between a 3-way and 4-way switch?
A 3-way switch wiring diagram controls lights from two locations, while a 4-way switch allows control from three or more spots.
2. Can I use a regular switch in a 3-way setup?
No, 3-way switches have an extra terminal for traveler wires, which standard switches lack.
3. Why does my 3-way switch only work one way?
This usually means the traveler wires are reversed—swap them at one switch.
4. Can I install a dimmer in a 3-way switch setup?
Yes, but use a 3-way compatible dimmer and follow wiring instructions carefully.
5. What happens if I wire a 3-way switch incorrectly?
The light may not turn on, switches may not work properly, or a short circuit could occur—always verify wiring before powering up.
By mastering the 3-way switch wiring diagram, you can enhance your home’s lighting efficiency and convenience. Happy wiring! 🛠️💡