Installing a 3-way switch 3 switches allows you to control a single light from multiple locations, making it ideal for large rooms, staircases, and hallways. This guide provides a detailed 3-way switch 3 switches wiring diagram, step-by-step instructions, and expert tips for a safe and efficient installation.
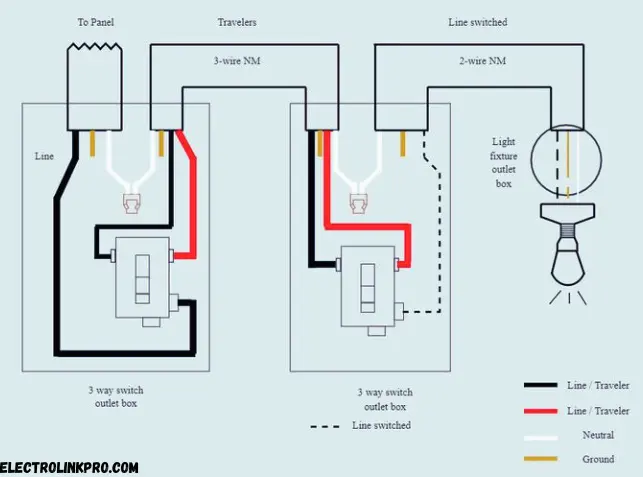
Wiring Diagram of a 3 way switch 3 switches:
⚡ 3-Way Switch 3 Switches Wiring Diagram (Step-by-Step)
🔌 Step 1: Turn Off Power & Prepare Wiring
- Shut off the circuit breaker.
- Run 14/3 or 12/3 NM cable between all switches and the light.
- Identify traveler wires (red & black), neutral (white), and ground (green/bare).
🔌 Step 2: Connect the First 3-Way Switch
- Common terminal (black screw) → connects to the power source (hot wire).
- Traveler terminals (brass screws) → connect to red and black wires running to the 4-way switch.
🔌 Step 3: Install the 4-Way Switch
- Two pairs of traveler wires from the first and second 3-way switches connect to the 4-way switch.
- Ensures signal passes between all switches.
🔌 Step 4: Connect the Second 3-Way Switch
- Common terminal → connects to the light fixture.
- Traveler terminals → link to the 4-way switch.
🔌 Step 5: Wire the Light Fixture
- Neutral (white) → connects to the light.
- Hot (black from 3-way switch) → powers the light.
⚠️ Safety Tips for 3-Way Switch 3 Switches Installation
✔ Always turn off power before working.
✔ Use a voltage tester to confirm wires are dead.
✔ Secure all wire connections with wire nuts.
✔ Follow NEC (National Electrical Code) guidelines.
🔎 Troubleshooting Common Issues
❌ Light Doesn’t Turn On → Check traveler wire connections.
❌ Only One Switch Works → Verify 4-way switch wiring.
❌ Flickering Light → Tighten all connections.
✅ Alternative Wiring Methods for 3-Way Switch 3 Switches
- Using Smart Switches (e.g., Lutron Caséta) for wireless control.
- Power-Through Wiring (if power enters at the light fixture).
📌 Conclusion
Proper installation of 3-way switch systems with three switches requires strict adherence to electrical safety protocols and national standards. As outlined in NFPA 70 (National Electrical Code) Article 404, all switch installations must include proper circuit de-energization, verified using appropriate testing equipment per OSHA 29 CFR 1910.303 requirements.
For optimal safety and compliance, we recommend consulting the complete NFPA 70 guidelines and OSHA electrical standards, along with the IEEE 3001.9 recommended practices for commercial installations. These resources provide the most current specifications for proper wiring techniques, load calculations, and installation best practices. Always verify local code amendments through your municipal building department, as they may supersede national standards in some jurisdictions.
Key Resources:
❓ Frequently Asked Questions (FAQs)
Here are some frequently asked questions about frequently asked questions
1. Can I use a dimmer in a 3-way switch with 3 switches setup?
Yes, but ensure the dimmer is compatible with 3-way and 4-way switches.
2. What’s the difference between a 3-way and 4-way switch?
A 3-way switch has 3 terminals, while a 4-way switch has 4 and is used between two 3-way switches.
3. Why is my 3-way switch not working after installation?
Check traveler wire connections and ensure the 4-way switch is correctly wired.
4. Can I add more than three switches to control one light?
Yes, by adding extra 4-way switches between the two 3-way switches.
5. What wire gauge should I use for a 3-way switch setup?
Use 14/2 or 12/2 NM cable for most residential installations (15A or 20A circuits).
By mastering the 3-way switch 3 switches wiring diagram, you can enhance your home’s lighting control efficiently and safely! 🚧💡